

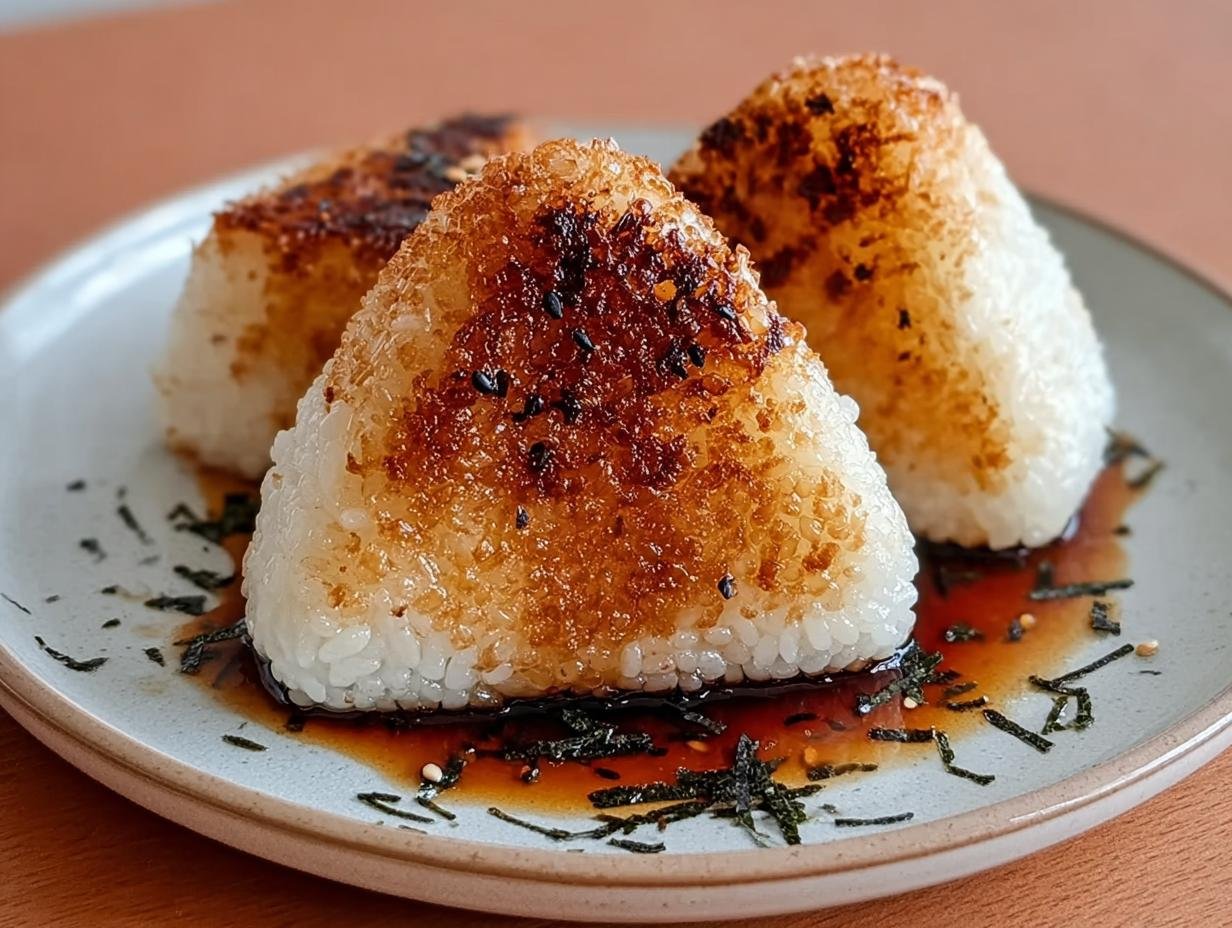
Crispy Yaki Onigiri have a special place in my heart, reminding me of cozy evenings and the comforting aroma of grilled goodness. I remember the first time I tried these pan-fried Japanese rice balls; the satisfying crunch followed by the soft, warm interior was pure magic. My grandmother used to make them for me after school, and the simple, savory flavor always hit the spot. Now, I love the process of making crispy yaki onigiri at home, and the way the soy sauce glaze caramelizes on the outside is just divine. Let’s get cooking!
Why You’ll Love This Crispy Yaki Onigiri
You’re going to adore these little flavor bombs for so many reasons:
- Incredible Taste: The perfect balance of salty grilled rice balls with a satisfyingly crispy exterior.
- Quick Prep: Ready to go in just 15 minutes, making them ideal for busy weeknights.
- Healthy Choice: A lighter option compared to many fried snacks, packed with simple goodness.
- Budget-Friendly: Uses basic pantry staples, so you don’t need to break the bank.
- Family Favorite: Kids and adults alike will devour these savory grilled rice balls.
- Versatile Snack: Great on their own or as a side dish for any meal.
- Authentic Flavor: Experience a true taste of Japanese comfort food.
Ingredients for Crispy Yaki Onigiri
Gathering the right yaki onigiri ingredients and steps makes all the difference for this recipe. Here’s what you’ll need to create these delightful crispy yaki onigiri:
- 2 cups Japanese short-grain rice (cooked and slightly cooled) – This sticky rice is essential for shaping and holding together. Make sure it’s just warm, not piping hot.
- 1 tablespoon soy sauce – This forms the base of our savory glaze, adding that classic umami depth.
- 1 teaspoon toasted sesame oil – Adds a wonderful nutty aroma and flavor to the glaze.
- 1 tablespoon neutral oil (like avocado or canola) – For pan-frying, this helps achieve that perfect golden crust.
- Optional fillings: pickled plum (umeboshi), cooked salmon, or seasoned lamb – Get creative with your favorite savory additions!
- Optional garnish: sesame seeds, chopped scallions, or nori strips – For a beautiful finish and extra texture.
How to Make Crispy Yaki Onigiri
Making these delightful crispy yaki onigiri at home is surprisingly simple, and the results are incredibly rewarding. Follow these easy steps to achieve that perfect golden crust and tender interior.
- Step 1: Prepare the Rice
Start with freshly steamed Japanese short-grain rice. It’s crucial that the rice is still warm but not piping hot – this makes it easier to shape and helps it stick together. If your rice has cooled too much, you can gently warm it in the microwave for about 30 seconds.
- Step 2: Shape the Onigiri
Wet your hands with cool water and sprinkle a pinch of salt onto your palms. This prevents the rice from sticking to your hands and seasons the outside. Take about ½ cup of the warm rice and gently cup it in your hands. Press just enough to form a compact triangle or round ball, usually about 1 inch thick. If you’re adding a filling, like umeboshi or cooked salmon, make a small indentation in the center of the rice, add your filling, and then carefully seal the rice around it.
- Step 3: Prepare the Glaze
In a small bowl, whisk together the soy sauce and toasted sesame oil. This simple mixture creates the signature savory flavor and helps the onigiri get that beautiful, caramelized exterior. This is the key to that delicious yaki onigiri soy sauce glaze.
- Step 4: Grill or Pan-Fry
Heat a non-stick skillet or a cast-iron pan over medium heat. Add the neutral oil and let it get warm. Carefully place the shaped onigiri into the hot pan. Don’t overcrowd the pan; cook in batches if necessary. Let them sear undisturbed for about 3–4 minutes on each side. You’re looking for a beautiful, deep golden-brown crust to form. This is how you get crispy rice balls!
- Step 5: Glaze and Finish
Once both sides have developed a nice crispy crust, brush both sides of the onigiri generously with the prepared soy-sesame glaze. Grill for an additional minute per side, just until the glaze caramelizes and becomes slightly sticky. This intensifies the flavor and adds another layer of deliciousness.
- Step 6: Serve Warm
Remove the crispy yaki onigiri from the pan and place them on a serving plate. Garnish them with toasted sesame seeds, finely chopped scallions, or a strip of nori for extra flair and flavor. They are best enjoyed immediately while they are still warm and crispy.
Pro Tips for the Best Crispy Yaki Onigiri
Want to elevate your crispy yaki onigiri game? These little tricks will ensure your homemade grilled rice snacks are absolutely perfect every time. I’ve learned a few things over the years that make a big difference!
- Use slightly day-old rice if possible, as it holds its shape better than freshly cooked rice.
- Don’t pack the rice too tightly when shaping; a gentle touch is key for a tender interior.
- Ensure your pan is properly heated before adding the onigiri for that essential crispy crust.
- Brush the glaze on during the last minute of cooking to prevent burning.
What’s the secret to perfect crispy grilled rice balls?
The secret lies in the medium heat and not overcrowding the pan. This allows the rice to develop a beautiful, golden crust without burning. For an authentic yaki onigiri recipe experience, a slightly thicker rice ball also helps. For more on cooking techniques, you might find testing the elements helpful.
Can I make crispy yaki onigiri ahead of time?
Yes, you can shape your onigiri ahead of time! Store them covered in the refrigerator for up to 24 hours before grilling. Just be sure to let them sit at room temperature for about 15-20 minutes before pan-frying to ensure even cooking.
How do I avoid common mistakes with making crispy yaki onigiri?
A common mistake is using rice that’s too hot or too cold; aim for warm. Also, resist the urge to move the onigiri too soon in the pan – let that crust form! Over-glazing before the crust is set can also lead to sogginess. For a similar texture, consider our spaghetti with garlic and oil.
Best Ways to Serve Crispy Yaki Onigiri
These delightful crispy yaki onigiri are incredibly versatile, perfect for a quick snack, a light lunch, or even as part of a larger meal. I love serving them as a unique crispy rice ball appetizer at parties because they’re always a hit! For a more substantial meal, they pair wonderfully with a simple miso soup and a side of pickled vegetables. You can also enjoy them alongside teriyaki chicken or a fresh green salad for a balanced and satisfying Japanese-inspired dinner. They truly are a fantastic savory grilled rice ball snack for any occasion. If you’re looking for other appetizer ideas, check out our appetizers section.
Nutrition Facts for Crispy Yaki Onigiri
Here’s a breakdown of the nutritional information for these delicious crispy yaki onigiri, per serving (which is one onigiri):
- Calories: 180
- Fat: 5g
- Saturated Fat: N/A
- Protein: 3g
- Carbohydrates: 34g
- Fiber: 1g
- Sugar: N/A
- Sodium: 220mg
Nutritional values are estimates and may vary based on specific ingredients used, especially if you add optional fillings or garnishes to your pan-fried Japanese rice balls. For more information on nutritional components, you might find the many benefits of onions interesting.
How to Store and Reheat Crispy Yaki Onigiri
Even though these Japanese grilled rice snacks are best enjoyed fresh off the pan, you can absolutely store and reheat them. Once your crispy yaki onigiri have cooled completely to room temperature, place them in an airtight container. You can keep them in the refrigerator for about 3 to 4 days. For longer storage, freezing is a great option! Wrap each cooled onigiri tightly in plastic wrap, then in a layer of aluminum foil, and store them in your freezer for up to 3 months. Don’t worry, they reheat beautifully!
To reheat, I usually opt for a dry skillet over medium-low heat. Place the onigiri in the warm pan and cook for a few minutes per side until they’re heated through and the exterior has regained some of its crispiness. Avoid the microwave if you can, as it tends to make them soft. If you’re in a real rush, a toaster oven or even a conventional oven set to around 350°F (175°C) for 5-10 minutes can also work wonders to bring back that delightful crunch.

Frequently Asked Questions About Crispy Yaki Onigiri
What is yaki onigiri?
Yaki onigiri are essentially grilled or pan-fried Japanese rice balls. They’re a beloved snack or side dish that starts with simple steamed rice, shaped, and then grilled until golden and slightly crispy on the outside, while remaining soft and steamy inside. The grilling process usually involves a savory glaze, making them incredibly flavorful.
What’s the best crispy yaki onigiri recipe for beginners?
For beginners, the best approach is to keep it simple! Focus on using good quality Japanese short-grain rice and don’t overwork the rice when shaping. A basic glaze of soy sauce and a touch of sesame oil is perfect. The key to the best crispy yaki onigiri is patience during the searing process – let that crust form without rushing! For a similar simple preparation, consider our easy avocado toast recipe.
Can I add different fillings to my crispy yaki onigiri?
Absolutely! While classic fillings like umeboshi (pickled plum) or cooked salmon are popular, you can get creative. Try seasoned cooked chicken, a bit of tuna mayo, or even some finely chopped cooked mushrooms. Just make sure the filling is already cooked and cooled before adding it to the rice.
How do I get that perfect crispy texture on my pan-fried Japanese rice balls?
Achieving that perfect crispiness comes down to a few things: using warm, slightly sticky rice that’s not too wet, medium heat for pan-frying, and not moving the onigiri too soon. Letting them sear undisturbed for a few minutes on each side is crucial for developing that golden, crackly crust. For another dish with a great crispy element, try our bruschetta with beef tartare.
Variations of Crispy Yaki Onigiri You Can Try
Once you’ve mastered the basic crispy yaki onigiri, you’ll find there are so many fun ways to customize them! These variations add new dimensions to this beloved savory grilled rice ball snack. I love experimenting with different flavors and methods to keep things exciting.
- Miso Glazed: Whisk a teaspoon of miso paste with a tablespoon of soy sauce and a touch of mirin for a deeply savory and slightly sweet glaze.
- Garlic Butter: Melt butter with minced garlic and brush it onto the onigiri during the last minute of cooking for an irresistible aroma.
- Spicy Mayo: Mix your favorite mayonnaise with sriracha or gochujang for a creamy, spicy kick that pairs wonderfully with the grilled rice.
- Furikake Coating: Instead of just glazing, press a mixture of furikake seasoning and sesame seeds onto the outside of the onigiri before pan-frying for extra texture and flavor.
Crispy Yaki Onigiri: 6 Amazing Tips

Crispy Yaki Onigiri are grilled Japanese rice balls with a golden, crackly exterior and a tender, steamy interior. They are a simple yet soulful dish, often evoking nostalgic memories of childhood and home. This recipe uses basic pantry ingredients to create a deeply flavorful snack or side dish.
- Prep Time: 15 minutes
- Cook Time: 10 minutes
- Total Time: 25 minutes
- Yield: 4–6 onigiri 1x
- Category: Snacks / Side Dishes
- Method: Pan-Fried or Grilled
- Cuisine: Japanese
- Diet: Vegetarian
Ingredients
- 2 cups Japanese short-grain rice (cooked and slightly cooled)
- 1 tablespoon soy sauce
- 1 teaspoon toasted sesame oil
- 1 tablespoon neutral oil (like avocado or canola)
- Optional fillings: pickled plum (umeboshi), cooked salmon, or seasoned lamb
- Optional garnish: sesame seeds, chopped scallions, or nori strips
Instructions
- Prepare the Rice: Start with freshly steamed short-grain rice that has been slightly cooled, but is still warm to the touch.
- Shape the Onigiri: Wet your hands with water and sprinkle a pinch of salt onto your palms. Take about ½ cup of rice and gently shape it into a triangle or round ball. Press just enough to hold it together. If adding a filling, tuck a small amount into the center before sealing.
- Prepare the Glaze: In a small bowl, mix together soy sauce and sesame oil.
- Grill or Pan-Fry: Heat a non-stick skillet or cast-iron pan over medium heat. Add neutral oil, then place the onigiri down gently. Let them sear undisturbed for 3–4 minutes on each side until a golden, crispy crust forms.
- Glaze and Finish: Brush both sides with the soy-sesame mixture and grill for an additional minute per side.
- Serve Warm: Garnish with sesame seeds, chopped scallions, or a strip of nori. Serve immediately.
Notes
- For a gluten-free version, use tamari instead of soy sauce.
- Add furikake seasoning to the rice for extra flavor.
- Best enjoyed immediately, but can be reheated in a dry pan to restore crispiness.
Nutrition
- Serving Size: 1 onigiri
- Calories: 180
- Sugar: N/A
- Sodium: 220mg
- Fat: 5g
- Saturated Fat: N/A
- Unsaturated Fat: N/A
- Trans Fat: N/A
- Carbohydrates: 34g
- Fiber: 1g
- Protein: 3g
- Cholesterol: N/A


Leave a Reply